
How to Use Concealer for Contouring and Highlighting: A Comprehensive Makeup Contouring Tutorial
Concealer is a versatile makeup product that can do much more than just hide imperfections. When used correctly, it can be a powerful tool for contouring and highlighting, helping to sculpt and define your facial features. In this tutorial, we’ll guide you through the process of contouring with concealer and highlighting with concealer, ensuring you achieve a flawless finish.
Understanding the Basics of Contouring and Highlighting
Before diving into the application process, it’s essential to understand what contouring and highlighting are:
- Contouring is the technique of creating shadows on your face to define and enhance your natural bone structure. This usually involves using a shade of concealer or foundation that is two shades darker than your skin tone.
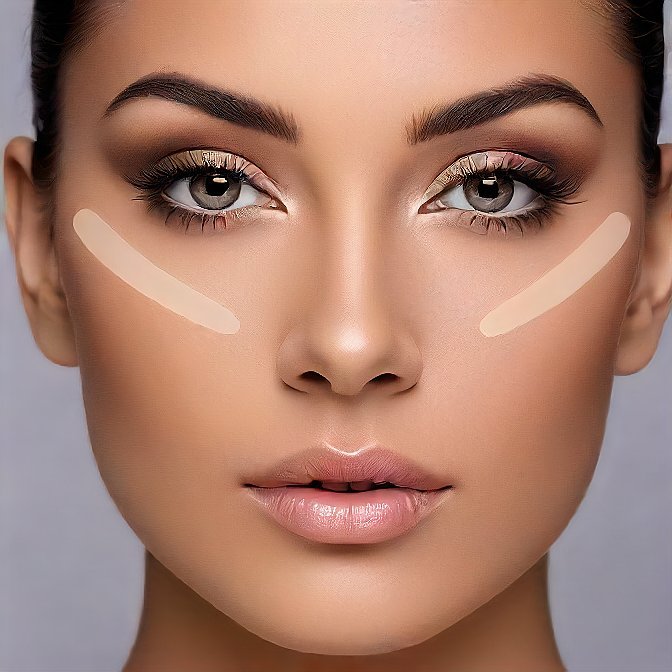
- Highlighting brings attention to specific areas of your face, making them appear more prominent and radiant. For this, you’ll use a concealer or foundation that is one to two shades lighter than your skin tone.
Step-by-Step Guide to Contouring and Highlighting with Concealer
Step 1: Gather Your Tools
To achieve the best results, you’ll need:
- A creamy concealer (one darker than your skin tone and one lighter)
- A beauty sponge or makeup brush
- Setting powder (optional)
Step 2: Prep Your Skin
Start with a clean and moisturized face. Apply your foundation to create an even base. This will ensure that the concealer blends seamlessly.
Step 3: Contouring with Concealer
- Identify Contour Areas: Using your darker concealer, apply small amounts to the areas you want to contour. Typically, this includes:
- Under the cheekbones
- Along the jawline
- On the sides of the nose
- On the temples
- Blend: Using a damp beauty sponge or a makeup brush, blend the contour into your foundation. Use dabbing motions to ensure the product is well-distributed and not harsh.
Step 4: Highlighting with Concealer
- Identify Highlight Areas: Take your lighter concealer and apply it to the areas you want to highlight, such as:
- The tops of your cheekbones
- The bridge of your nose
- The center of your forehead
- The cupid’s bow
- Blend: Again, using your sponge or brush, blend the highlight into the skin. The goal is to create a seamless transition between the contour and highlight areas.
Step 5: Set Your Makeup
If you’re looking for longevity, set your makeup with a translucent setting powder. Lightly dust the powder over the highlighted areas to keep them from creasing and to ensure your look lasts throughout the day.
Tips for Perfect Contouring and Highlighting with Concealer
- Choose the Right Shades: The success of contouring and highlighting with concealer largely depends on selecting the right shades. Make sure the darker concealer is two shades darker than your skin tone and the lighter one is one to two shades lighter.
- Start Small: When learning how to contour and highlight with concealer, it’s best to start with small amounts of product. You can always build up for more intensity.
- Practice Blending: The key to a natural look is seamless blending. Take your time to blend the concealer thoroughly into your skin.
- Consider Your Face Shape: Tailor your contour and highlight techniques to suit your unique face shape for the most flattering results.
FAQs
What is the best concealer for contouring and highlighting?
The best concealers for contouring and highlighting are creamy and blendable. Look for formulations that offer good coverage but are not too thick. Popular options include cream concealers and stick concealers.
Can I use liquid foundation for contouring and highlighting?
Yes! Liquid foundations can be used for contouring and highlighting as long as you choose the right shades. Just ensure they have a good consistency for blending.
How do I make my contour and highlight last all day?
To make your contour and highlight last, set them with a light dusting of translucent powder. Additionally, using a setting spray can help lock everything in place.
Is contouring with concealer suitable for all skin types?
Yes, contouring with concealer can be adapted for all skin types. However, those with oily skin may prefer matte concealers, while those with dry skin should opt for creamy formulas that provide hydration.
Conclusion
Contouring and highlighting with concealer is a fantastic way to enhance your natural beauty and create a sculpted look. By following this makeup contouring tutorial, you’ll be well on your way to mastering these essential techniques. Remember, practice makes perfect, so don’t hesitate to experiment until you find what works best for you!


